| Configuration Name
|
Enter a name for the current trench configuration in
the field and Save the settings to reuse throughout the project.
|
| Profile Data Settings
|
Define the physical parameters of the trench using the
fields available:
- Name
- Base Height
- Base Width
- Cover Height
- Cover Width
- Interior Width
- Wall Height
- Wall Thickness
|
| Has Cover
|
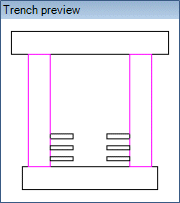
This check box toggles whether a cover is included
with the trench. If you enable this option, the cover will display in Preview
section. (The cover is included in the image above.)
|
| Place Trench Supports
|
This check box toggles whether trench supports are
placed with the trench. If you enable this option, the supports will display in
the Trench Preview section as shown:
|
| Automatically create cable routing lines through
fittings
|
When Enabled, this cable routing lines will be
automatically routed through Trench fittings such as Tees, Elbows etc. When
Disabled, you will need to manually route these cable lines when fittings are
encountered.
|
| Trench Preview
|
Provides a preview image of the trench. As you click
in any of the physical parameter fields to define it, the section is
highlighted in the preview image. Toggling other options, such as Has Cover and
Place Trench Supports, will also toggle the display of these options in the
Preview.
|
| Support Preview
|
Provides a preview image of the support. As you
define the Support settings, Length, Width and Height, the changes are
reflected in the preview.
|